Manual · Chapter 6
The timeline
Tracks and clips, selecting, moving, trimming and cutting, the editor's tools, snapping, the music grid, markers, in and out points, groups, nesting and automation.
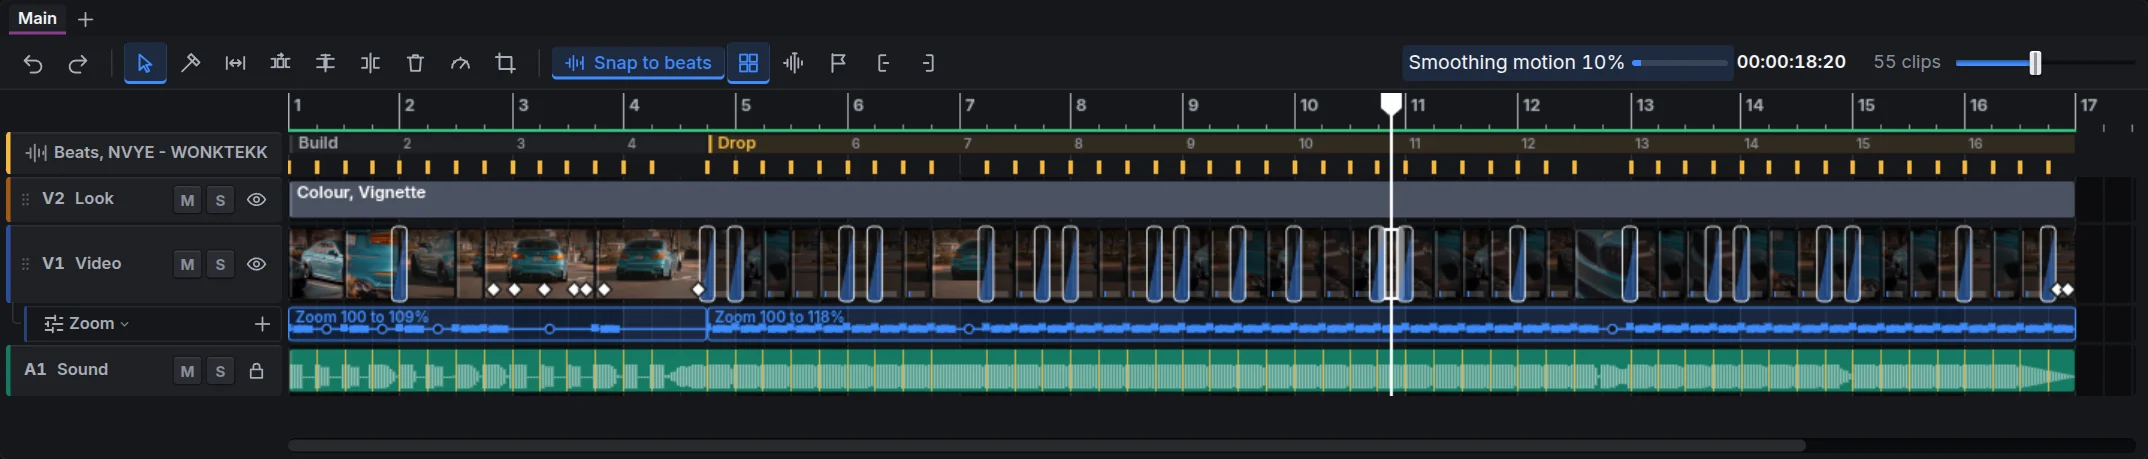
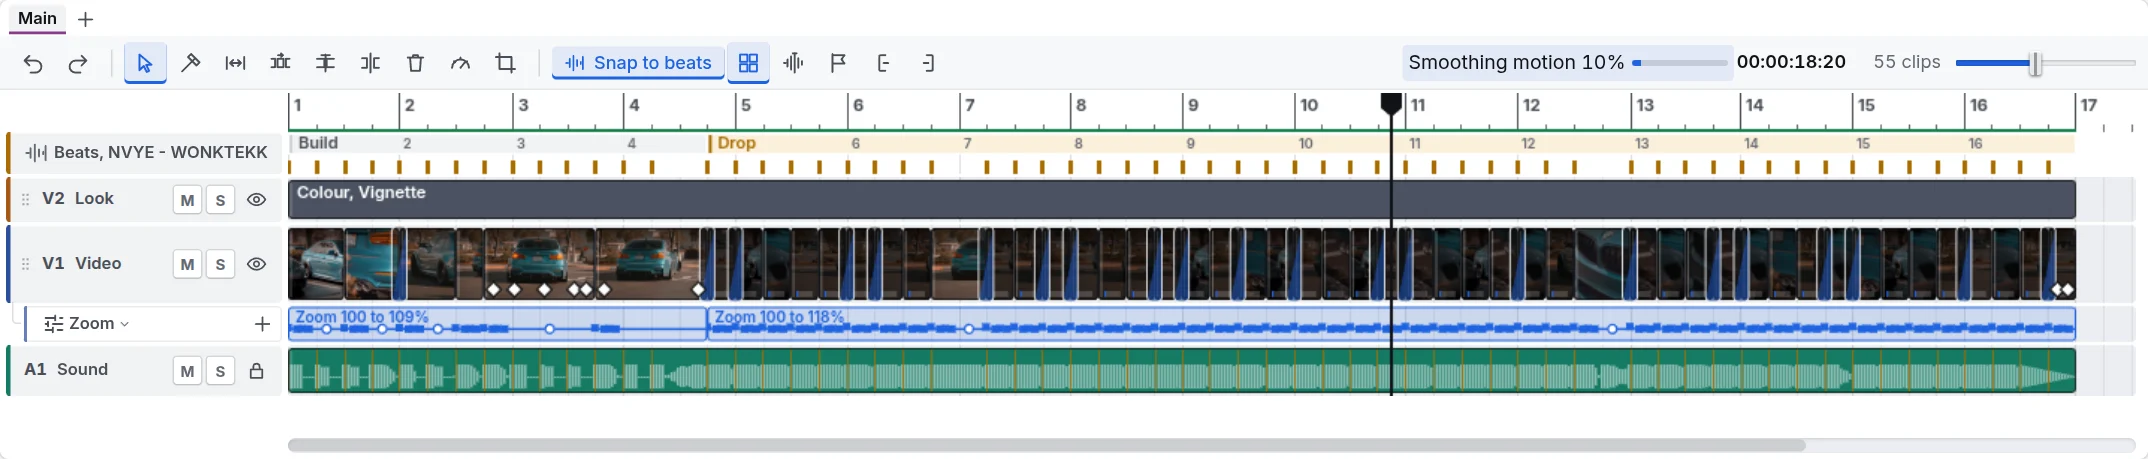
The timeline is the edit: time runs left to right, and each row, a track, holds clips. A clip higher up is drawn over the ones below it, so titles and overlays go on the tracks above your footage, and sound goes below.
Finding your way
- The playhead is the white line: the viewer shows the frame under it. Click the ruler to move it, or drag it.
- Zoom with the slider at the right of the toolbar, = and -, or 0 to fit the whole edit. Hold Ctrl and scroll over the timeline to zoom there.
- Scroll with the scrollbar under the tracks, or with the mouse wheel and Shift.
- Step with ArrowLeft and ArrowRight a frame at a time, ShiftArrowLeft and ShiftArrowRight a beat at a time, AltArrowLeft and AltArrowRight a bar at a time. Home and End go to the start and the end.
Tracks
Each track's head, on the left, has its name and buttons: M mutes it, S plays it alone (solo), the eye hides a picture track, the lock keeps a track from being changed. Drag a head by its grip to move the track up or down; a picture track brings its sound tracks with it.
- Add a track: Sequence, Add a video track or Add an audio track, or right-click a head.
- Delete a track: right-click its head and choose Delete the track, or click the head and press Delete.
- Make a track taller: drag the bottom edge of its head. Double-click the edge to put it back.
A clip keeps its colour as far as it is heard or seen: a sound turned down greys, a volume fade greys along it, and a picture greys with its opacity. A clip not heard or seen at all keeps a dashed edge and shows how far down it is, such as -60 dB or 0%.
Selecting
- Click a clip to select it. Shift-click or Ctrl-click to add more.
- Drag a box across empty space to select every clip it touches.
- CtrlA selects everything; Escape clears the selection.
The inspector on the right always shows what is selected. Several clips of one kind are changed together.
Moving and trimming
- Move: drag a clip, along its track or onto another. Several selected clips move together. A video's sound follows its picture into the sound row under the new track where there is room, and rows a move, a paste or a delete leaves empty go (a row you named, or gave settings of its own, stays). Captions and titles selected together also move to and from the captions track.
- Trim: drag a clip's left or right edge. A cut between two clips that touch stays glued: drag it and both clips change. With several clips selected, dragging the edge of one trims them all by as much.
- Trim to the playhead: Q trims the start of the selected clip to the playhead, W trims its end.
- Split: S cuts the selected clips at the playhead (a video and its sound together).
- Delete: Delete removes the selected clips and leaves a gap. ShiftDelete removes them and closes the gap (ripple delete).
- Copy and paste: CtrlC, CtrlX and CtrlV (at the playhead). Paste attributes (CtrlAltV) puts a copied clip's effects, position and scale, opacity, sound or text style on every selected clip. Copy properties (CtrlShiftC) and Paste properties (CtrlShiftV) put everything of one clip on the selected clips of its type: its picture and keyframes, effects, sound, a video's speed, a title's look and animation. Where each clip is and what it plays stay its own.
Drag anything from a panel over the timeline and a preview shows where it will land before you let go.
The tools
The toolbar has the tools editors use to fine-tune cuts. Choose one, or press its key:
| Tool | Key | What it does |
|---|---|---|
| Select | V | Select, move and trim: the usual tool. |
| Blade | B | Cut a clip where you click. |
| Slip | Y | Move the footage inside a clip, keeping the clip where it is. |
| Slide | U | Move a clip between its neighbours, which trim to make room. |
| Roll | R | Move the cut between two clips, one getting longer as the other gets shorter. |
Snapping and the beat
With snapping on (N, or Snap in the toolbar), clips and the playhead snap to the song's kicks and bars, to clip edges, to markers and to the playhead. Without a song, snapping still catches clip edges, markers and the playhead; the music grid's button and Snap cuts to the kicks show on the toolbar once the song's beats are known. Hold Alt while you drag (a clip, an edge, a key, a point) to place it exactly where the pointer is, nothing snapping it.
- Snap cuts to the kicks (ShiftK) moves the cuts near a kick onto it, where the footage allows; with clips selected, only the cuts at their edges.
- The song's kicks, snares, bars and sections show on the beats row at the top. An auto edit has them; for an edit made by hand, use Find the beats in the Techniques panel. Drag a kick to where it really is, select one and press Delete to take it out, or double-click the row to add one.
The music grid
Where the song's bars are known, the ruler counts bars like a music program does, and the tracks show a line on every beat and a stronger one on every bar, every other bar shaded. It makes cutting to the music easy to see. The grid button beside Snap, or View, Music grid, turns it off; the studio remembers your choice.
Markers, and in and out points
- Markers: M adds a marker at the playhead. Double-click its flag to name it and give it a colour. CtrlArrowLeft and CtrlArrowRight jump between markers.
- In and out points: I and O mark the start and end of a part of the edit, also from the buttons in the toolbar. Drag their edges on the ruler. Loop (CtrlShiftL) plays the part again and again, and Export can export only that part. CtrlShiftX clears them.
Groups, links and nesting
- Link: a video's sound moves with its picture. Unlink (CtrlL) separates them.
- Group (CtrlG) keeps clips together, such as a sound effect and the zoom it lands on: they are selected and moved as one. Ungroup with CtrlShiftG.
- Nest: Clip, Nest turns the selected clips into a sequence of their own that plays as one clip. Double-click it, or its tab above the timeline, to edit inside.
- Sequences: one project can hold several. The tabs above the timeline switch between them; + makes a new one.
- Adjustment layer: Sequence, Add adjustment layer puts a clip whose effects apply to everything under it.
- Bring to front and Send to back move a picture above or below the others.
Automation
A track's volume, pan and filters, or a picture's opacity, zoom, position and rotation, can follow a line of points over time. Right-click a track's head and choose what to automate (Add automation: Volume, for example): a lane appears under the track with a clip of points. Double-click the line to add a point, drag a point to move it. A zoom lane can be pulsed on every kick of the song in one step.
Undo and history
CtrlZ undoes and CtrlShiftZ redoes; a long session keeps its most recent steps. Edit, History (CtrlShiftH) lists every step; choose one to go back to it.